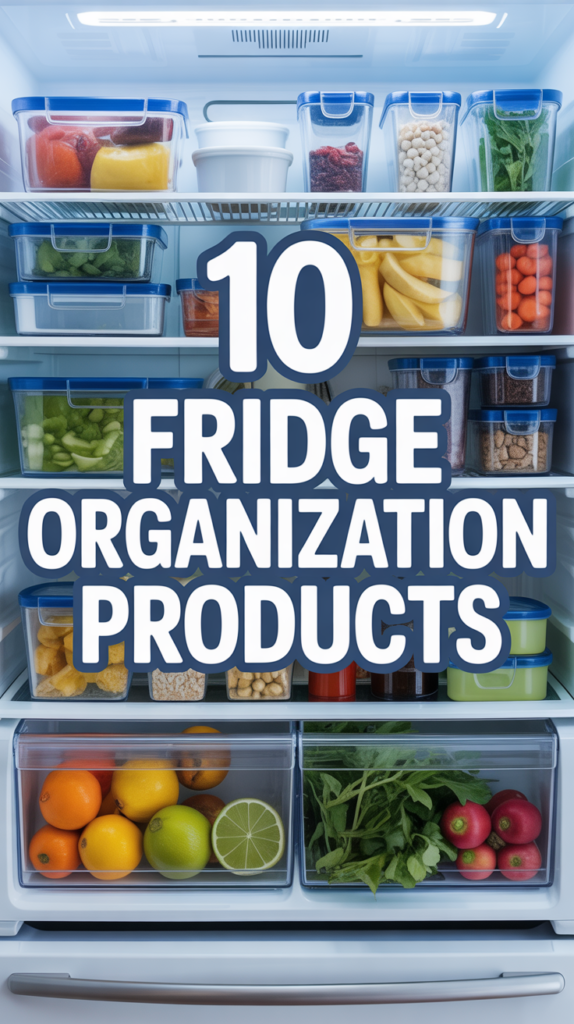
10 Fridge Organization Products That Save Your Sanity (and Your Produce) You’ll Actually Use
Let’s be honest: a chaotic fridge is a mood killer. You open the door, a rogue yogurt dives for freedom, and your lettuce looks like it lived a hard life. The fix? Smart, simple fridge organizers that keep everything fresh, visible, and actually easy to grab when you’re hangry. I’m talking less waste, fewer mystery leftovers, and produce that lasts longer—without turning your fridge into a Pinterest project you’ll abandon next week.
Below are 10 game-changing products, each with a mini “recipe” for setting up your fridge like a pro. Short steps, real-life tips, and zero judgment if your condiment collection needs its own zip code.
10 Fridge Organization Products That Save Your Sanity
1. Clear Stackable Bins That Stop the Snack Avalanche
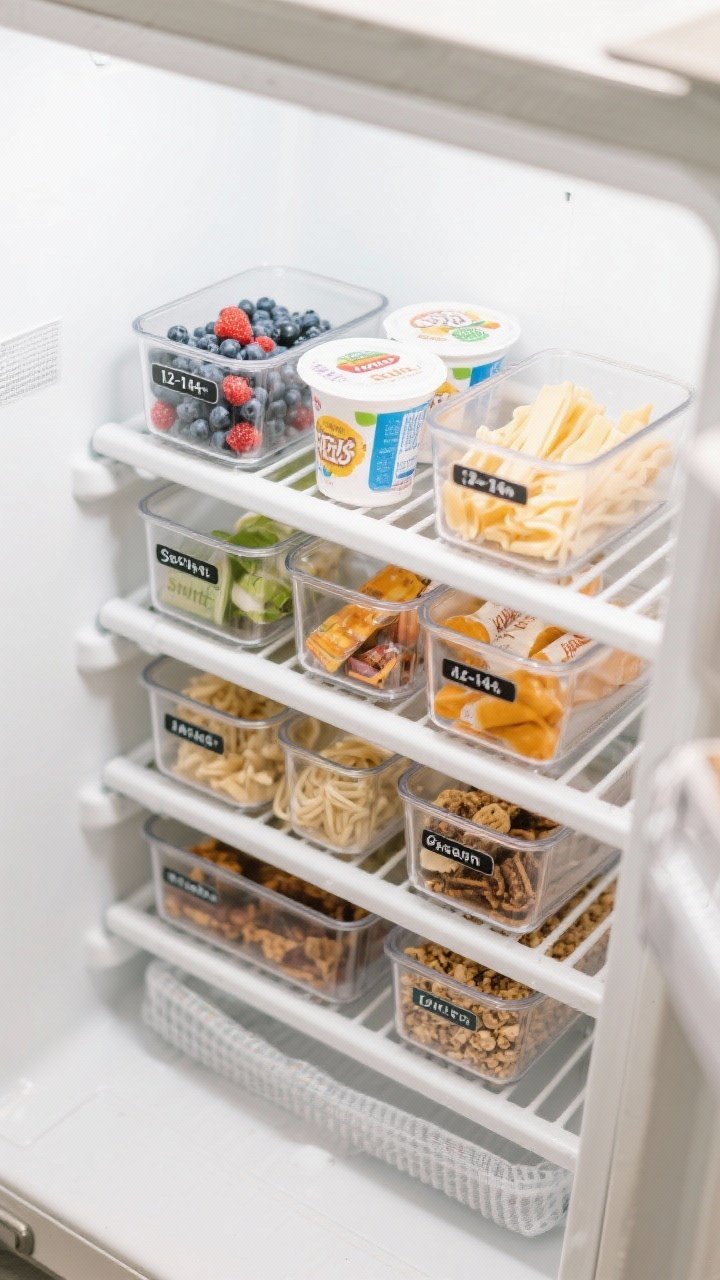
These are the MVPs of a calm fridge. Transparent, stackable, and ridiculously satisfying, clear bins make everything visible and reachable. They’re especially great for snacks, kids’ lunch gear, and corralling small items that usually vanish behind the milk.
Ingredients:
- 4–6 clear stackable fridge bins (12–14 inches long, narrow height)
- 1 label maker or removable label stickers
- Optional: non-slip bin liners
Instructions:
- Measure your fridge shelves and choose bins that stack without touching the back air vents.
- Assign each bin a category: Snacks, Yogurt, Leftovers, Breakfast, Deli, Grab-and-Go.
- Label the front of each bin clearly so everyone knows what belongs where.
- Place heavier bins on lower shelves and stack lighter bins on top to prevent wobbling.
- Restock to the front as you use items so you actually see what needs replenishing.
Pro tip: Keep one “Eat Me First” bin for foods that are about to expire. It’s a tiny change that cuts waste fast. Swap non-slip liners into bins with glass jars to prevent clinks and cracks.
2. Adjustable Drawer Dividers for Produce Drawers That Finally Make Sense
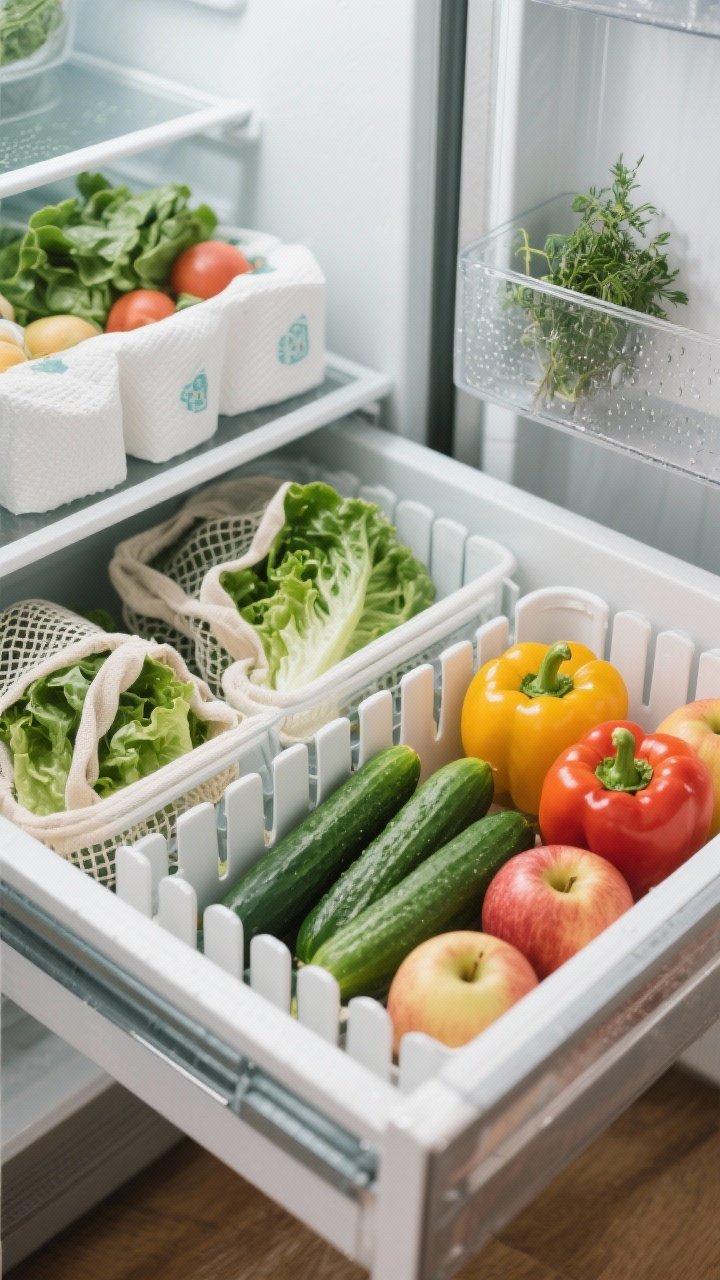
Your crisper drawers shouldn’t be where herbs go to die. Adjustable dividers create zones—leafy greens, crunchy veg, citrus, herbs—so you can find everything in seconds. They also stop apples from bruising your delicate lettuce. Harmony in a drawer.
Ingredients:
- 2 sets of adjustable fridge-safe drawer dividers
- Reusable produce bags or paper towels
- Optional: produce savers for herbs
Instructions:
- Clean the drawers and dry them fully to help dividers grip.
- Create 3–4 zones: Leafy Greens, Crunchy Veg (carrots, peppers), Fruit (citrus, berries), Herbs/Misc.
- Line the leafy green zone with paper towels to absorb moisture.
- Place ethylene-sensitive items (greens, berries) away from ethylene producers (apples, pears).
- Add labels at the front lip for quick ID. Restock like with like.
Serving suggestion: Dedicate a small section to prepped veggies (sliced cucumbers, carrot sticks) to make snack time frictionless. You’ll actually eat them—promise.
📥 Save Time This Week!
Get our FREE 7-Day Dinner Plan + Grocery List — all the recipes, shopping lists, and meal prep tips you need to breeze through the week.
Instant download. No spam, just delicious dinners. Unsubscribe anytime.
3. Lazy Susan Turntables for Sauce Superstars

Condiments pile up fast. A turntable keeps everything in rotation—literally—so you stop knocking over the sriracha to reach the miso. Perfect for sauces, small jars, and pickles that deserve more than the back-of-shelf exile.
Ingredients:
- 1–2 clear lazy Susans (10–12 inches, with high sides)
- Microfiber cloth for occasional wipe-down
- Optional: one small turntable for the top shelf
Instructions:
- Group condiments by function: Savory (miso, soy, chili oil), Dressings, Breakfast (jams, nut butters).
- Place each category on its own turntable. Keep frequent-use items front-facing.
- Set the turntables in the middle or top shelf where spinning is easiest.
- Do a weekly spin-and-wipe to catch spills and check dates.
Variation: Use a smaller turntable to corral tiny jars like capers, anchovies, and tomato paste. It’s the easiest way to build a “flavor station” for fast weeknight cooking.
4. Egg Trays with Lids That Stack Like a Dream
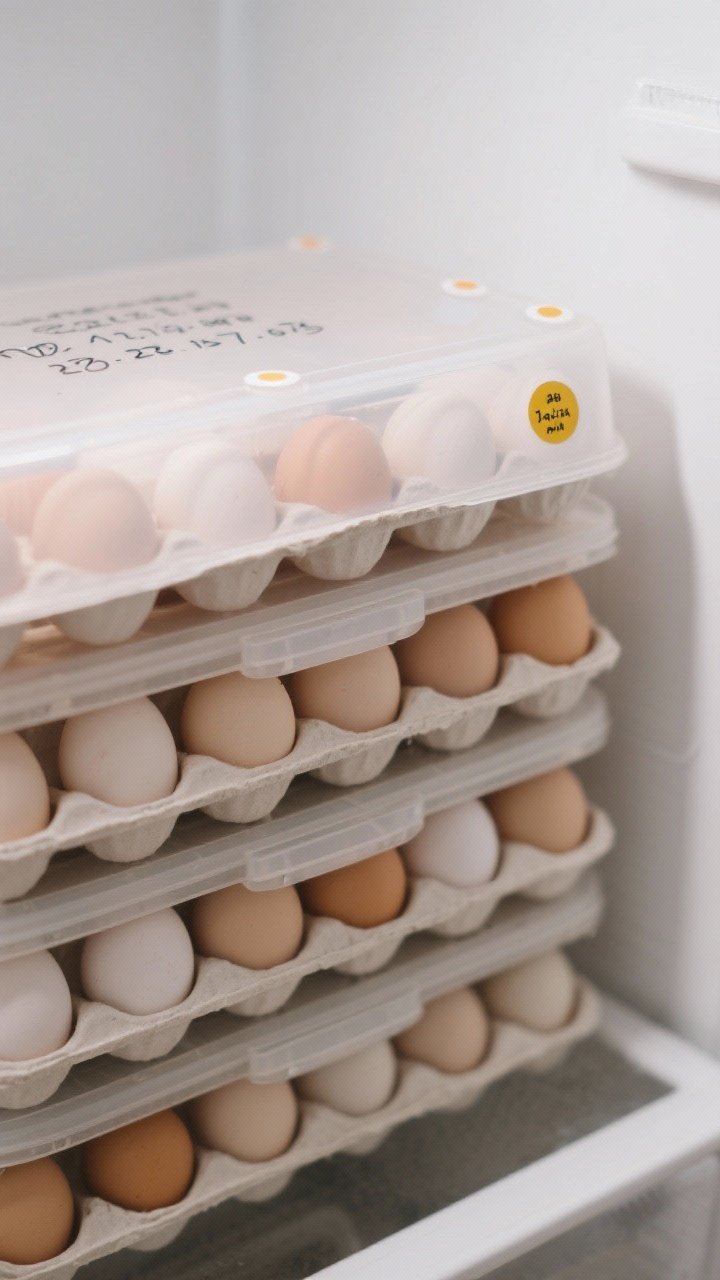
The standard egg carton is fine—until you need space. A lidded egg organizer stacks neatly, protects your eggs, and frees up room above for a bin or leftovers. Bonus: you can actually see when you’re running low.
Ingredients:
- 1–2 lidded egg trays (holds 14–18 eggs)
- Dry-erase marker for the lid
- Optional: date dot stickers
Instructions:
- Transfer eggs pointy-side down to the tray. This keeps the yolk centered and fresher longer.
- Write the purchase date on the lid with a dry-erase marker.
- Stack a shallow bin of breakfast items (bacon, cheese, tortillas) on top if your fridge height allows.
- Store on a middle shelf for consistent temperature—not on the door.
Pro tip: Keep one space empty to rotate older eggs forward. A quick water test (sink = fresh, float = old) can help if you lose track.
5. Can Organizers That Turn Seltzer Chaos Into a Beverage Bar
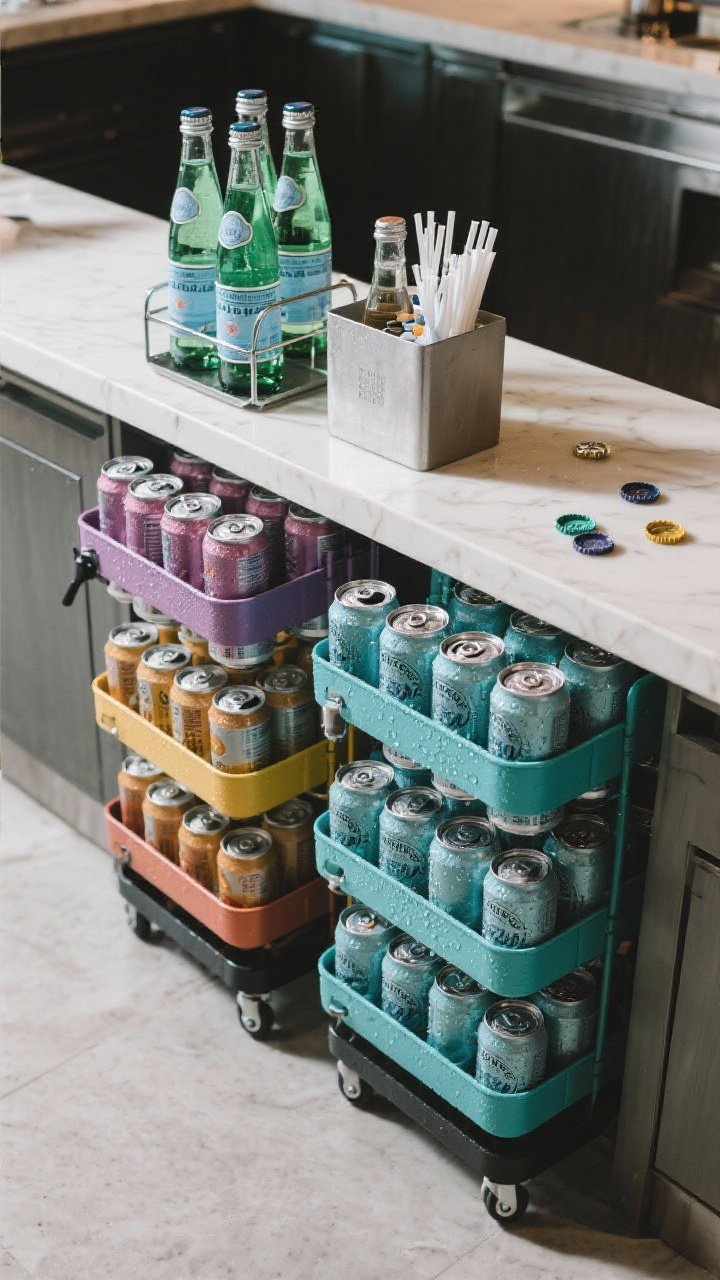
If your fridge looks like a carbonated Jenga tower, can dispensers are your fix. They load from the back and dispense from the front so the oldest drinks get used first. No more late-night soda avalanches.
Ingredients:
- 1–2 rolling can dispensers (holds 9–12 cans each)
- Optional: slim bottle organizer for tall beverages
- Small bin for bottle caps or reusable straws
Instructions:
- Designate one shelf as the beverage zone—middle or lower for weight.
- Load cans from the back so they roll to the front automatically.
- Place a slim bottle rack beside the can organizer for wine, kombucha, or cold brew.
- Keep a jar or small bin nearby for straws, stoppers, and reusable ice packs.
Serving suggestion: Pre-chill cocktail mixers and citrus in the same zone. Instant happy hour with zero digging.
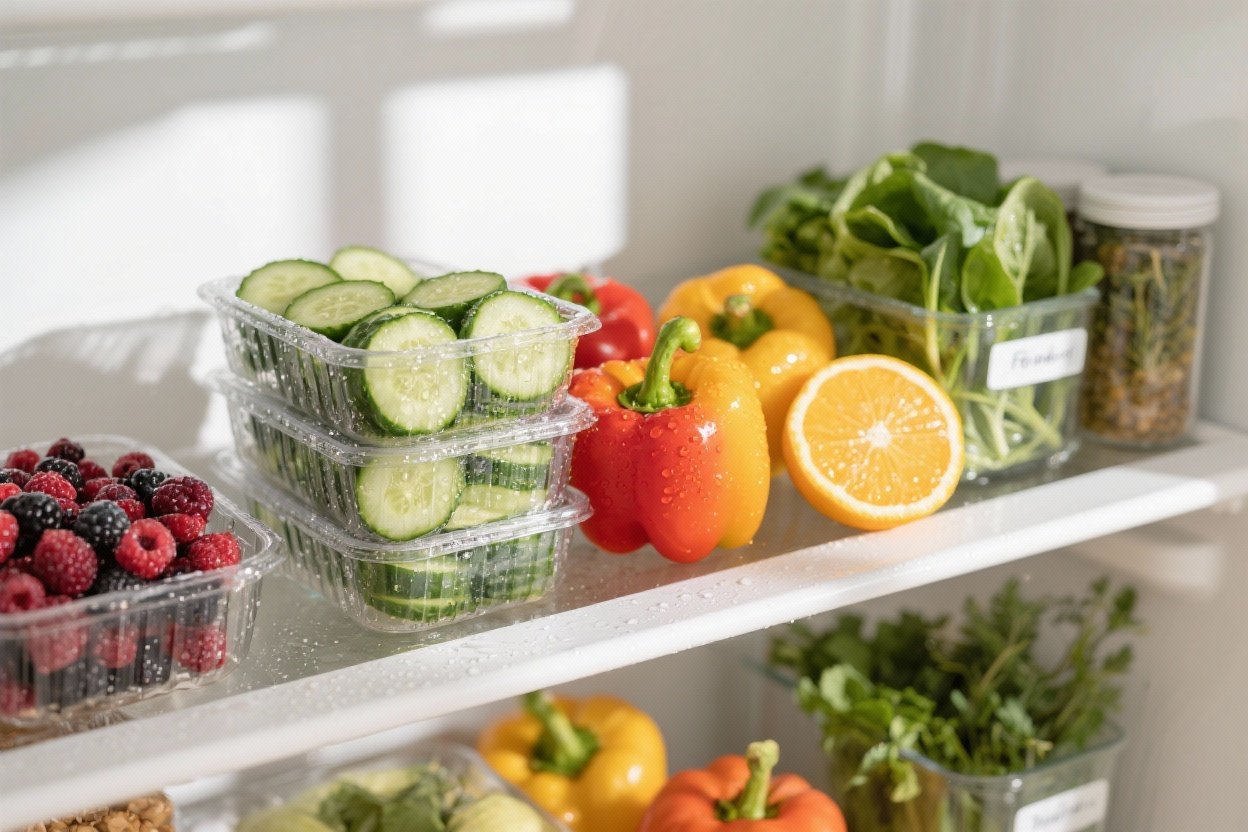
6. Produce-Saving Vented Containers That Actually Keep Greens Alive
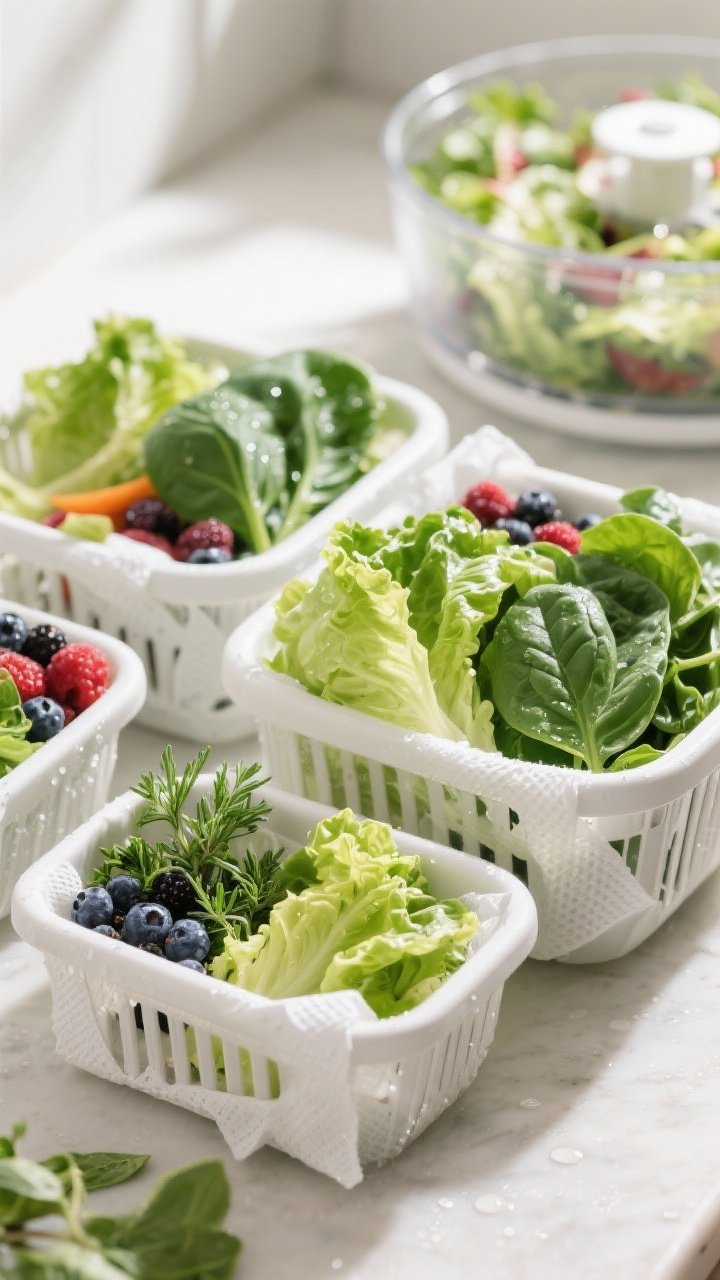
These are the “why didn’t I do this sooner?” containers. They regulate airflow and humidity so delicate produce stays crisp twice as long. Think perky herbs, crunchy lettuce, and berries that don’t collapse by Wednesday.
Ingredients:
- 3–5 vented produce containers in various sizes
- Paper towels or produce liners
- Salad spinner (optional but helpful)
Instructions:
- Rinse greens and berries gently, then dry thoroughly—use a spinner or pat dry.
- Line each container with a paper towel to absorb moisture.
- Set vents based on produce: open for berries and herbs, closed or half for leafy greens.
- Label containers with the date. Store in the crisper or lower shelf.
Variation: Dedicate one container to pre-washed salad mix. Add toppings in small lidded cups (nuts, cheese) so lunch is basically assemble-and-go.
7. Door Shelf Bins That End the Sauce Domino Effect
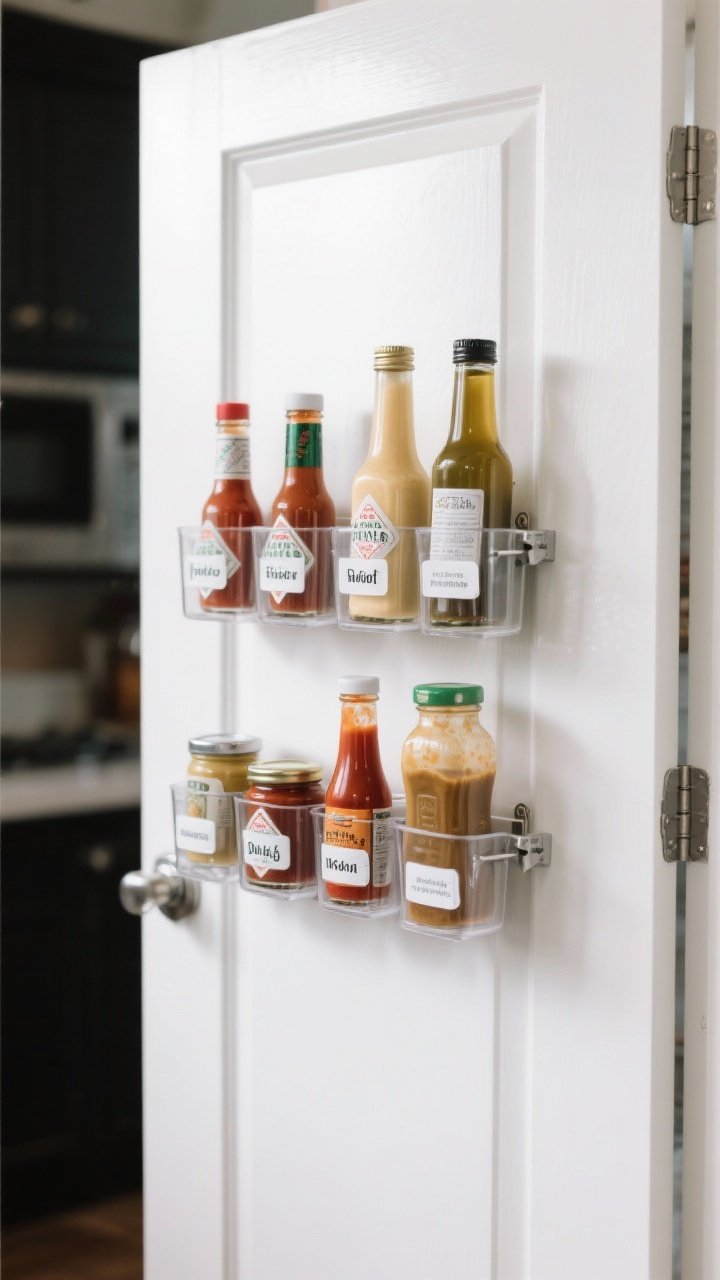
Your fridge door is valuable real estate. Door bins add structure so jars don’t topple every time someone grabs milk. Use them to group like items and keep tiny tubes (tomato paste, wasabi) from sneaking into the abyss.
Ingredients:
- 4–6 small door shelf bins or clip-on organizers
- Waterproof labels
- Optional: bottle stabilizers for taller items
Instructions:
- Assign categories by door tier: Top for small jars and tubes; middle for dressings; bottom for condiments and nondairy milk.
- Place small clip-on bins to keep loose items corralled.
- Add labels so everyone returns items to their home base.
- Avoid storing eggs or fresh dairy on the door where temps fluctuate.
Pro tip: Keep hot sauces together with a “heat scale” from mild to wild. Your future taco nights will thank you.
8. Slide-Out Shelf Trays for Leftovers You’ll Actually Eat
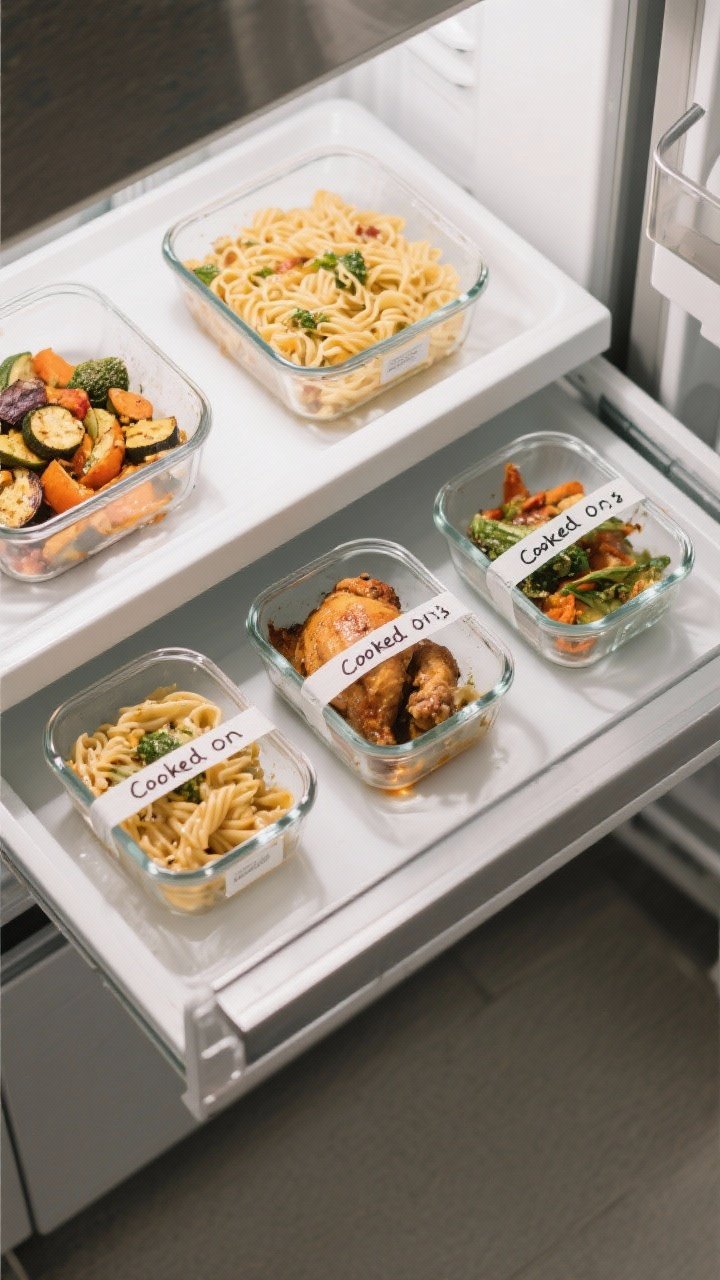
Slide-out trays turn deep shelves into easy-access zones, so leftovers don’t become science experiments. They’re like tiny drawers that glide out smoothly so nothing gets forgotten in the shadows.
Ingredients:
- 2–3 slide-out fridge trays (food-safe, low-profile)
- Dry-erase tape for labeling “Cooked On” dates
- Shallow, uniform glass containers with lids
Instructions:
- Install trays on a middle shelf for eye-level visibility.
- Use same-size glass containers to stack evenly and seal tightly.
- Label each container with the date it was cooked. First in, first out.
- Make one tray the “Lunch Zone” so you can grab and go in the morning.
Serving suggestion: Keep a mini seasoning kit—flaky salt, chili flakes, lemon wedges—in a small bin nearby. Even leftovers deserve a glow-up.
9. Stackable Dairy and Deli Drawers for Cheese Boards on Command
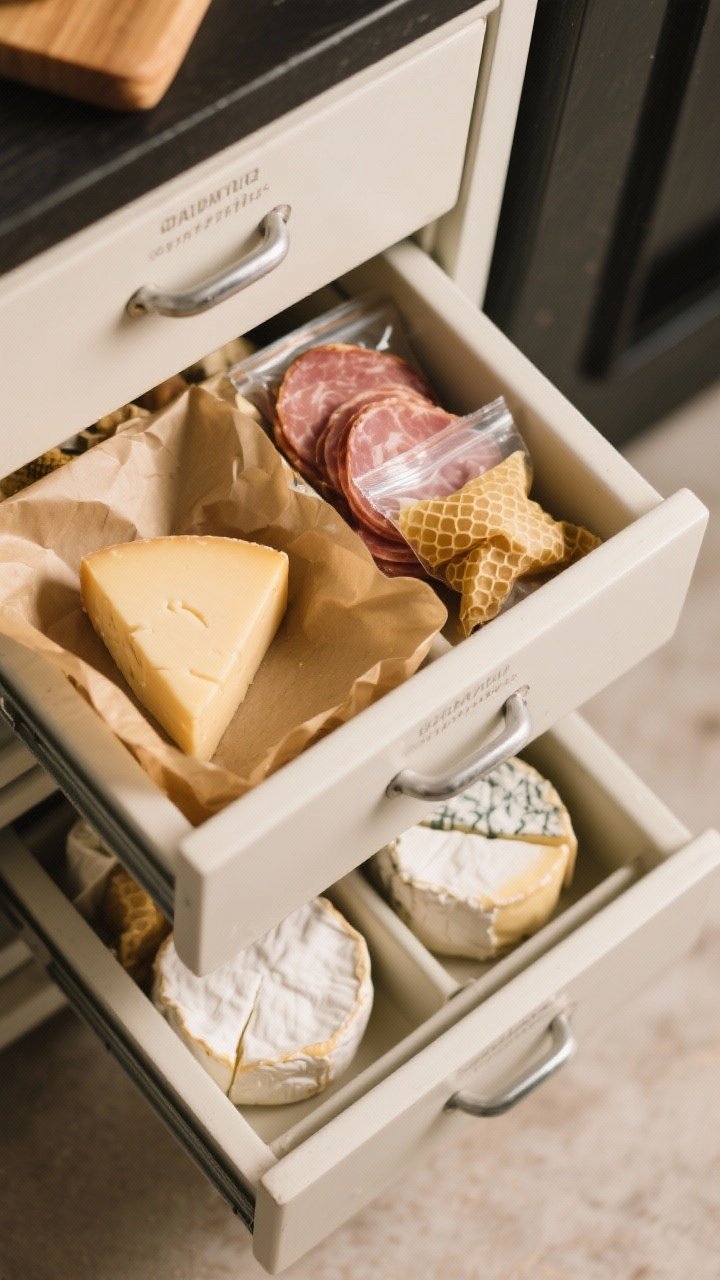
If cheese, meats, and spreads bring you joy (same), give them a dedicated space. Stackable deli drawers keep aromas contained, slices tidy, and soft cheeses from drying out. It’s like a charcuterie drawer that always says yes.
Ingredients:
- 2–3 stackable deli/dairy drawers with lids
- Parchment paper for wrapping cheeses
- Small zip bags or beeswax wraps for open packs
Instructions:
- Wrap soft cheeses loosely in parchment; rewrap after each use.
- Group by category: Soft cheeses, Hard cheeses, Deli meats, Spreads.
- Stack drawers on a cooler, lower shelf where temps are stable.
- Keep one drawer for “Board Night” with olives, cornichons, and nuts.
Pro tip: Add a small piece of folded paper towel in each drawer to control moisture. Replace weekly to keep things fresh.
10. Slim Mat Liners and Spill-Proof Glass Shelves for Easy Cleanups
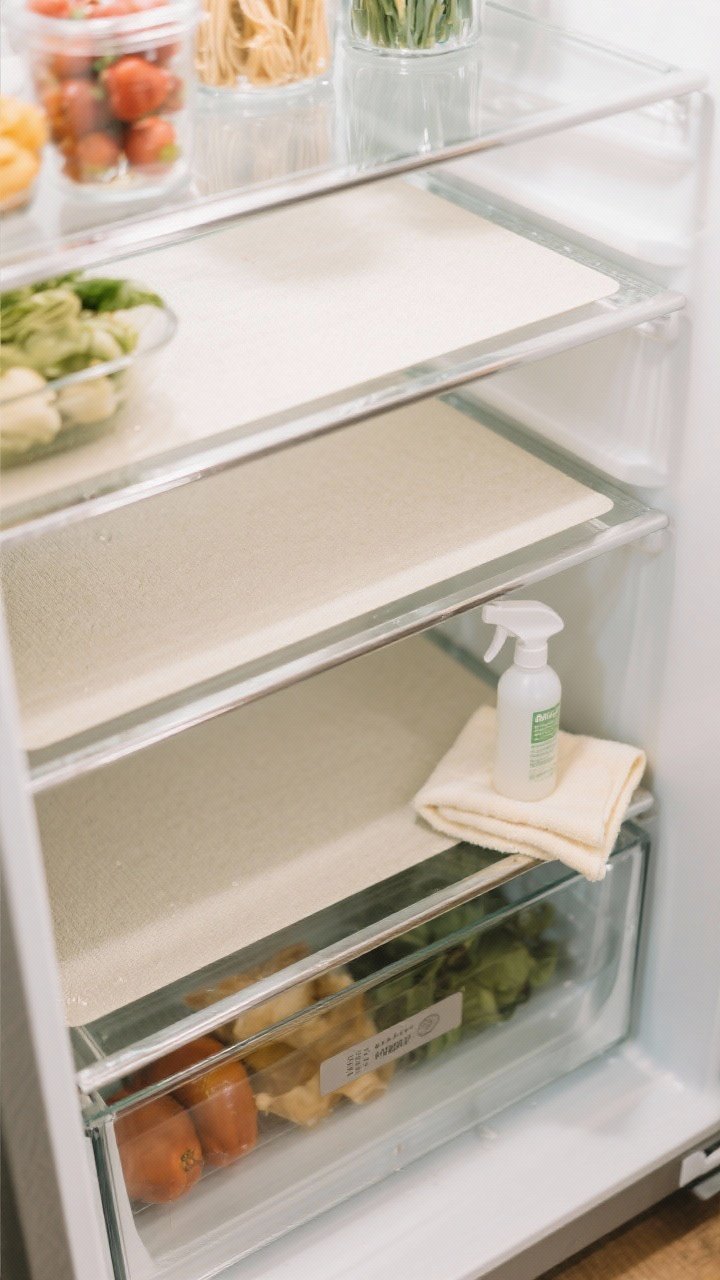
Okay, not a “bin,” but mats and spill-proof shelves are the unsung heroes. They catch drips, keep jars from sliding, and make cleanup a quick swipe instead of a full scrub. That alone is sanity-saving.
Ingredients:
- 4–6 cut-to-size fridge shelf liners (BPA-free, non-adhesive)
- Spill-proof glass shelves (if compatible with your fridge model)
- Mild spray cleaner and microfiber cloth
Instructions:
- Remove shelves and wipe them down. Let dry completely.
- Cut liners to fit snugly—no curling edges to catch containers.
- Place liners on the most spill-prone shelves: beverage zone, leftovers, condiments.
- Do a quick weekly wipe. If something leaks, pull the liner, rinse, and replace.
Variation: Use textured liners under glass jars and bottles to minimize clinking and sliding. Your midnight snack runs will be stealthy and quiet.
Final Tips to Keep Your Fridge Zen
- Follow a loose “map”: Ready-to-eat at eye level, raw ingredients lower, condiments on the door.
- Leave space around vents for airflow—your compressor will thank you.
- Do a five-minute Friday sweep: toss expired, wipe crumbs, restock the “Eat Me First” bin.
Set up once, and your fridge basically runs itself. Fewer spills, no produce graveyard, and way more “oh hey, I forgot I had that goat cheese” moments—in a good way. Go grab a few of these organizers and give your fridge the glow-up it deserves. Your future self (and your crispy greens) will be very, very happy.
Printable Recipe Card
Want just the essential recipe details without scrolling through the article? Get our printable recipe card with just the ingredients and instructions.